Glomo is a cross-border payments platform. Each product section holds two kinds of page. Pages titled as a noun, such as Subscriptions, explain what an object is. Pages titled as a job, such as Set up recurring subscriptions, are integration guides that give the APIs in the order you call them. A guide sits one level under the object it sets up.
Pick the section that matches your integration. Each one lists the calls in order and links the full guide.
- A step that starts with an
operationIdis an API call. Look it up in the API reference or in /openapi.json. - Not an API call marks a step in your frontend or your server, or a webhook you wait for.
Shared calls: createCustomer and createOrder are the same calls in every collection flow, LRS included. createBeneficiaryV2 and createPayout are the same calls for payouts and for LRS withdrawals. Create each customer once and reuse the returned ID. Purpose codes come from closed lists, one for payins and one for payouts. Pick from the list; never guess a code.
For merchants collecting a single payment against an order or a payment link. Use the Payment API variant only if you are PCI-DSS certified and your account has server-to-server payments enabled.
createCustomerPOST /customer— create the payer once and store thecust_ID.createOrderPOST /orders— call it from your server with your secret key. Send arequest_id; a reused one is rejected.- Not an API call: open Glomo checkout with the Unified SDK, passing the order ID and your public key.
- Not an API call: on your server, verify the signature on the checkout response. Check it against each of your active secret keys; any one matching is valid.
getPaymentByIdGET /payment/{id}— confirm the final status, or take it from thepaymentwebhook. Never mark an order paid from the browser alone.
Full guide: Checkout
createCustomerPOST /customer— create the payer once and store thecust_ID.createOrderPOST /orders— send arequest_id; a reused one is rejected.createPaymentPOST /payment— sendorder_id,method: card, the card and an HTTPScallback_url. Arequest_idis optional; a reused one is rejected.- Not an API call: send the customer to the URL in
next_stepsto authenticate the card (3DS). - Not an API call: on your
callback_url, verify thesignaturequery parameter. Check it against each of your active secret keys; any one matching is valid. getPaymentByIdGET /payment/{id}— confirm the final status, or take it from thepaymentwebhook.
Full guide: Accept card payments server-to-server
createCustomerPOST /customer— create the payer once and store thecust_ID.createPayinPOST /payin—purpose_codeis required unless your account has a default one. There is norequest_id, so check whether a timed-out create went through before you retry.- Not an API call: the customer opens the glomo-hosted link and pays.
getPayinByIdGET /payin/{id}— the link ispaidwhen complete. Thepayment_linkwebhook reports the same change.
Full guide: Payment Link
For merchants charging a customer's card on a fixed schedule (month or year) or whenever they present a charge (as_presented). The Payment API variant has the same PCI-DSS and account requirement as in one-time collection.
createCustomerPOST /customer— create the payer once and store thecust_ID.createSubscriptionPOST /subscriptions— setinterval_type. Foras_presented, sendmax_amount, leave outinterval_count,billing_cyclesandstart_date, and don't setstarts_with_first_paymenttofalse.- Not an API call: open Glomo checkout with the Unified SDK, passing the subscription ID and your public key, to take the first payment.
- Not an API call: on your server, verify the signature on the checkout response. Check it against each of your active secret keys; any one matching is valid.
getPaymentByIdGET /payment/{id}— confirm the first payment, or take it from thepaymentwebhook.createPaymentPOST /payment—as_presentedonly: charge each later payment withsubscription_id,sequence: subsequent,amount(up tomax_amount),currencyand a newrequest_id. Glomo chargesmonthandyearsubscriptions on schedule.
Full guide: Set up recurring subscriptions
createCustomerPOST /customer— create the payer once and store thecust_ID.createSubscriptionPOST /subscriptions— setinterval_type, as in the SDK checkout variant.createPaymentPOST /payment— the first payment: sendsubscription_id(notorder_id),method: card, the card and an HTTPScallback_url.- Not an API call: send the customer to the URL in
next_stepsto authenticate the card (3DS). - Not an API call: on your
callback_url, verify thesignaturequery parameter. Check it against each of your active secret keys; any one matching is valid. createPaymentPOST /payment—as_presentedonly: charge each later payment withsubscription_id,sequence: subsequent,amount(up tomax_amount),currencyand a newrequest_id.
Full guide: Accept card payments server-to-server
For Indian brokers and platforms that remit funds abroad for resident Indian investors under the Liberalised Remittance Scheme, and withdraw them back to the investor.
getLrsBanksGET /lrs/banks— optional: list the investor banks the remittance flow supports.createCustomerPOST /customer— create the investor once. LRS customers have stricter rules; see the guide.createLrsCustomerBankAccountPOST /customer/{id}/bank_account— register the investor's bank account and store its ID.createBeneficiaryV2POST /v2/beneficiaries— optional: only when the overseas beneficiary differs per investor or per transaction. Usecategory: lrs.createLrsQuotePOST /lrs/quotes— quote the remittance for the investor's bank. A quote expires after 30 minutes.createOrderPOST /orders— send thelrsobject with the quote ID,remittance_information, and the bank account and beneficiary IDs.amountandcurrency(USD) must match the quote, and the bank account's bank must match the quote's. Apurpose_code, if sent, must beS0001orS0002. Send arequest_id.- Not an API call: open Glomo checkout with the Unified SDK, passing the order ID and your public key.
- Not an API call: on your server, verify the signature on the checkout response. Check it against each of your active secret keys; any one matching is valid.
- Not an API call: wait for the
paymentwebhook withevent_typefunds_available. That, notsuccess, tells you the funds have landed.
Full guide: Collect LRS remittances from India
createBeneficiaryV2POST /v2/beneficiaries— usecategory: payout, an INR account and the IFSC inlocal_routing_number. The beneficiary must beactivebefore you pay it.createDocumentPOST /document— upload the investor's withdrawal consent letter.createLrsQuotePOST /lrs/quotes— optional: withresource: payout, an estimate of the INR the investor receives. You cannot attach it to the payout.createPayoutPOST /payouts— sendsource_currencyUSD,destination_currencyINR,source_amountin USD cents (required),payment_rail: neft(if you omitpayment_rail, Glomo uses SWIFT), purpose codeP0001, the document ID indocuments, and a uniquerequest_id. A reusedrequest_idreturns 409.getPayoutByIdGET /payouts/{id}— read the status, or take it from thepayoutwebhook.
Full guide: Withdraw an LRS remittance back to the investor
For merchants sending money from their Glomo balance to a beneficiary's bank account.
createBeneficiaryV2POST /v2/beneficiaries— usecategory: payout, with the bank details that the rail you will use needs. Only INR, AED, EUR, GBP and AUD have local rails: for any other destination currency, USD included, the rail is SWIFT, so the beneficiary needsswift_code.getBeneficiaryByIdV2GET /v2/beneficiaries/{id}— the beneficiary must beactive. A new beneficiary isactivestraight away unless Glomo has enabled beneficiary review on your account. With review enabled it startspending; in sandbox, approve it withPATCH /v2/beneficiaries/{id}/mock-review{"review_action": "approve"}. A payout to apendingorrejectedbeneficiary is refused. Thebeneficiarywebhook reports the change.createDocumentPOST /document— only if the purpose code needs documents. Pass the IDs in the payout'sdocuments.createQuotePOST /quotes— optional:resource: payoutfixes the rate and fee. With aquote_id, don't send amounts, currencies orpayment_railon the payout. A quote expires and can be used once.createPayoutPOST /payouts— without a quote, setpayment_rail: if you omit it, Glomo uses SWIFT, and a beneficiary without SWIFT details gets a 400. With aquote_id, sendingpayment_railis a 400. Send a payout purpose code. Send a deterministicrequest_id: a reused one returns 409, so retry with the same one and never with a new one.getPayoutByIdGET /payouts/{id}— read the status. The create call returns 201 even when the payout has already failed. Thepayoutwebhook reports each change.
Full guide: Send payouts with the API
For merchants receiving collections in local currency for their orders by bank transfer. Bank transfer must be enabled on your account. For other bank-transfer flows, such as a static virtual account, confirm the flow with Glomo before you build; they have no documented call sequence yet.
createCustomerPOST /customer— create the payer once and store thecust_ID.createOrderPOST /orders— send arequest_id.payment_methodslimits what checkout offers; leave it out to offer every method enabled on your account.- Not an API call: open Glomo checkout with the Unified SDK, passing the order ID and your public key. The customer picks bank transfer and sees the account details and the payment reference to use.
- Not an API call: handle the checkout's
payment.bank_transfer_submittedevent, or the redirect to yourcallbackUrl. It only means the customer says they sent the transfer. - Not an API call: take the final status from the
paymentwebhook. getEligiblePayinsGET /payment/{id}/eligible-payins— only when the payment isaction_requiredwithPAYIN_NOT_FOUNDorPAYIN_AMOUNT_MISMATCH: list the payins it can connect to.connectPayinPOST /payment/{id}/connect-payin— connect the payment to one of them. Resolving Action Required Payments covers the case where none is eligible.
Full guide: Checkout
For merchants who must accept funds only from the payer's registered bank account, such as brokers and fund platforms. Glomo enables TPV per account. TPV is the only value-added service documented here; for any other, confirm the flow with Glomo.
createCustomerPOST /customer— create the payer once and store thecust_ID.createCustomerBankAccountPOST /customer/{id}/bank-accounts— register the account the payer will pay from (account_numberplusbic_primaryorbic_secondary). A customer has one active account; a new one replaces it.createOrderPOST /orders— create the order as usual; it needs no TPV field.- Not an API call: collect the payment as in One-time collection.
- Not an API call: a bank payment from any other account leaves the payment
action_required. Third Party Verification (TPV) lists the mismatch reasons and what to do next.
Full guide: Verify a payer's bank account (TPV)
- Glomo overview — the platform glossary. What an LRS order, purpose code, virtual account or RFI actually is.
- Payin — collecting money: customers, orders, checkout, payment links, payment methods, refunds, disputes, subscriptions, LRS.
- Payout — sending money: the payout life cycle, rails, beneficiaries, purpose codes.
- Multi-currency accounts — holding money: balances, conversion, add and withdraw, and the settlement holiday calendar.
- Verification — KYC, bank account validation and TPV.
- Request for Information (RFI) — responding to a compliance request, per object.
- Reports — the reports you download or schedule from the dashboard for reconciliation, compliance and treasury.
- Identity and Access Management — one login across your MIDs, the Admin/Member/Sales Partner roles, and inviting your team.
- API reference — every endpoint, generated from OpenAPI. The OpenAPI description itself is published as one self-contained file at /openapi.yaml (JSON) — point your SDK generator, HTTP client or coding agent at it directly.
- Developer resources — authentication, errors, pagination, rate limits, webhooks, versioning, supported countries, quotes and the client SDKs.
Every request to the Glomo API carries an API key. You get your keys from the Glomo dashboard.
Log in: sign in to the Glomo dashboard.
Open API Keys: go to the API Keys page to see your Test and Live keys.
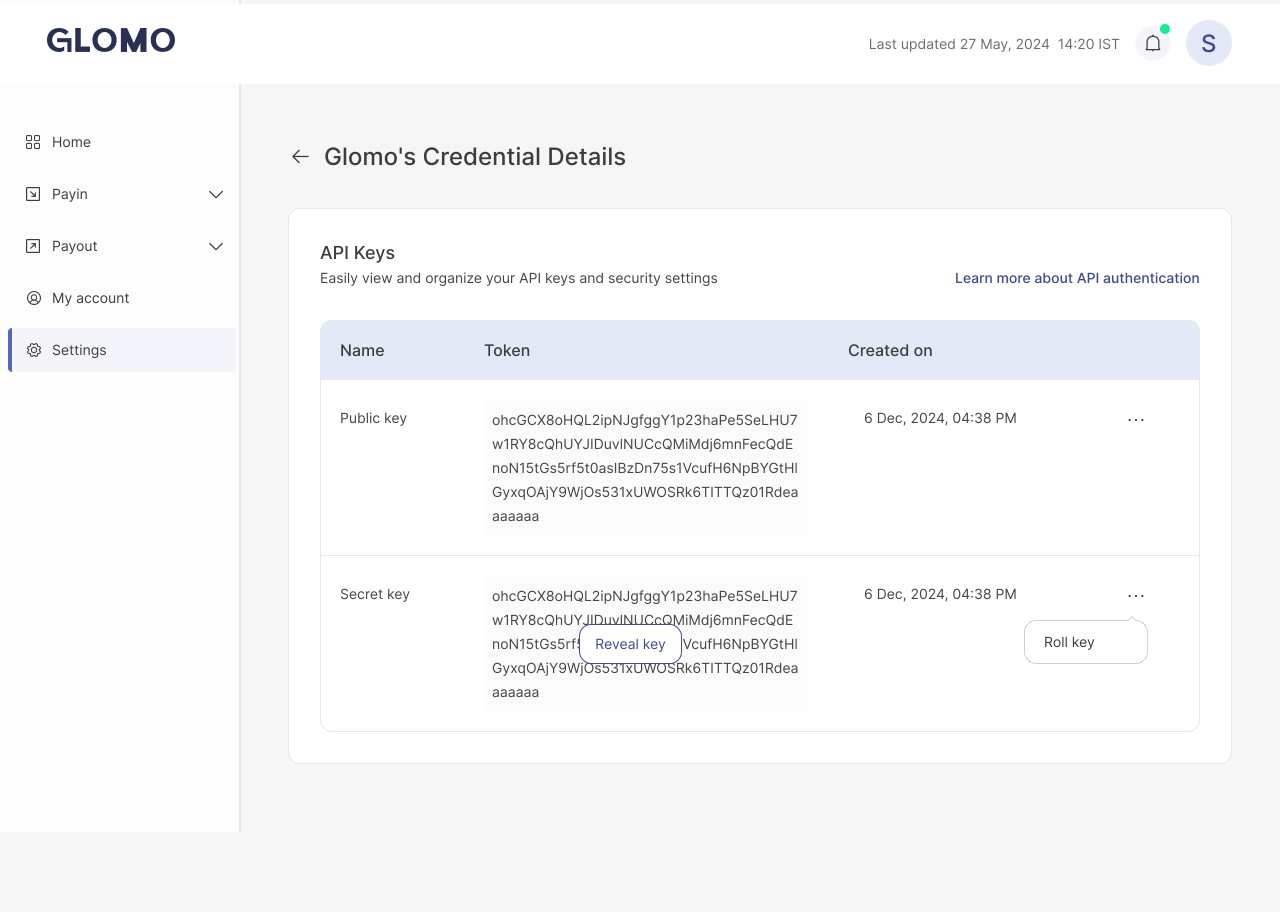
Choose your environment:
- Test: use test keys to simulate transactions without real money.
- Live: switch to live keys when you are ready to process real payments.
Integrate: see Authentication for how to send the key on every request, then follow the section for your integration above.